How To Vibe Edit Videos With One Prompt (Build This First)
Read Time: 12 Minutes
I now edit nearly 90% of my Shorts with AI. Each one starts with a single typed line.
Here are three of them.
Outdoor take. One prompt plus three attached photos.
Livestream clip. One prompt, nothing attached.
Tutorial with screen recordings. One prompt plus the captures.
For the first one, I typed:
/edit-outdoor-talking-head-resolve C3330. use attached photos in the hook where they show up one at a time above the title
The attached photos were headshots of the celebrities I name in the hook. They appear one at a time above the title, timed to the words.
For the second one, I typed:
/livestream-clip-to-short C3308
Nothing else. The clip came from a longer livestream. The model sped up the audio, cut on every sentence, changed the zoom on every cut, added the two-word captions, the red key-word callouts and the framework stage, then rendered the file above.
For the third one, I typed:
/builds-edit C3336
and attached two screen recordings and three screenshots. This is the video the skill was built on. Its first run took a long brief like the livestream one below, plus two rounds of notes. Every tutorial since then starts with that one line plus the captures. The model files the captures, cleans the take, crops each recording to the words that describe it, zooms in on the typing, drops the prompt full screen with the comment card, and renders.
Nine months ago, none of this worked. I have tested nearly every tool with “AI editor” in the pitch. As of September 2026, Fable 5.1 and GPT Astra are the best at taking your exact instructions and turning raw footage into the style of edit you want.
One problem stops most people after two videos: cost. These models burn usage credits fast, even on the $200 per month max plans. Describe every edit from scratch and an offshore editor costs about the same.
The way around this is to build your editing style once, save the style as a skill, and rerun the skill on every new clip. The first edit takes a detailed brief and one round of feedback. Every edit after takes one prompt and, most of the time, one shot.
Below is how I set this up: the tools, the first brief, what belongs in the skill, the B-roll library behind the third style, and the chain of prompts to file and schedule the finished video. All three skills are yours to download at the bottom, and they work in Claude Code or Codex.
The tool stack
Fable 5.1 or GPT Astra. I run Fable 5.1 inside Claude Code on the Max plan at $200 per month. The $100 per month plan still gives you decent usage once your skill exists. GPT Astra runs inside the Codex app. OpenAI has discontinued the Astra max plan at the time of writing, so $100 per month is the only option there for now.
DaVinci Resolve plus the MCP server. The AI does not edit inside a black box. The model drives DaVinci Resolve through the open-source davinci-resolve-mcp server, so every title, caption and cut stays editable in a real Resolve project.
HyperFrames works as an alternative. I show the HyperFrames editing workflow in this video. I have found DaVinci Resolve makes the edits cleaner, so the rest of this guide uses Resolve.
Install the server first, in a separate chat. You do not need Fable for the install. Opus uses fewer tokens and handles the setup fine. Paste this:
Install the DaVinci Resolve MCP server from https://github.com/samuelgursky/davinci-resolve-mcp on this Mac.

Run the setup command from the README (npx davinci-resolve-mcp setup), register the server for Claude Code, and confirm `claude mcp list` shows the server as Connected.

I have DaVinci Resolve [Studio or free edition], version [X]. Tell me which preference to change in Resolve (External scripting set to Local, or the in-app bridge for the free edition) and walk me through each click.

Once the server connects, open Resolve, read back the Resolve version through the MCP server, and tell me the result. Do not edit any project.
Start a fresh chat after the install finishes. Claude Code loads MCP servers when a chat opens, so the editing chat needs to start after the server exists.
Melda OS. This is my content operating system. Every piece of content I have made lives in one place with its script, raw footage and status, so AI reads one card and repurposes the content across formats. Join the waitlist at os.melda.co. You do not need this to follow along. Add the raw footage and script directly to your Claude Code or Codex chat and the skill works the same way.
Set up the footage and script first
Before any editing, I make sure the video has a card in Melda OS with the raw footage and the script attached.
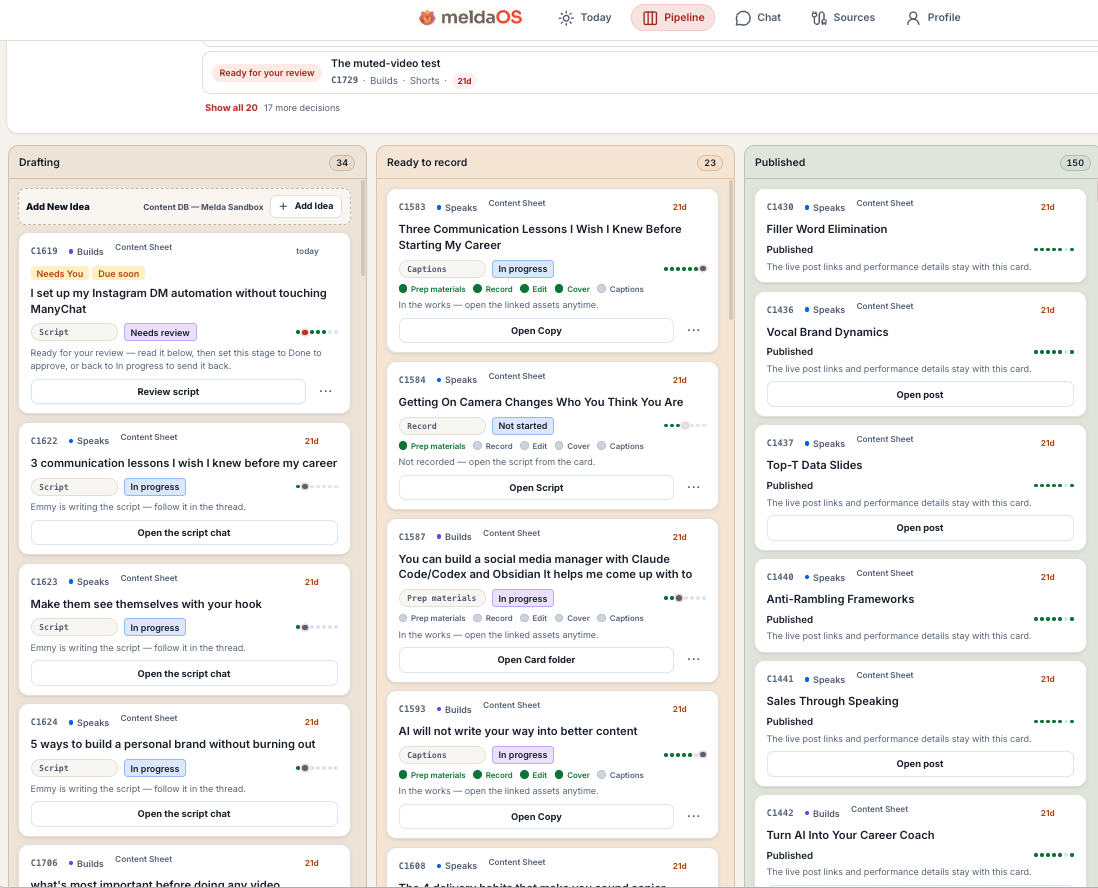
Every card holds the script, the captions doc, the raw footage folder and the status of each stage.
When I type a Content ID like C3330, the model reads the card, finds the raw file in the footage folder, checks the file hash, and pulls the script for caption alignment.
No database yet? Drop the raw file and the script into the chat. The model needs the same two things either way.
Tell the model which video you mean
Open a new chat with Fable 5.1 and ask for the row by Content ID:
Read the Content OS row for C3314. Find the raw footage in the Originals folder and the working transcript in the Script Doc. Confirm the file hash before you touch anything.
Now the model knows which footage, which script and which captions belong together.
Describe the edit in painstaking detail
This is the round where you spend the most credits, and the round where the skill gets built.
Open the raw video. Go through each beat of your short-form video and describe exactly what you want to see. Here is the brief I gave for the first livestream clip. The brief is for illustration only. Write your own for your own footage.
I want to edit C3314 from master content OS (video in the original folder) but I am going to give you very prescriptive feedback on this one line by line and I want you to use the Davinci Resolve MCP to edit it. At the end, we are going to create another short-form editing skill out of this (help me name it -- it's where we take clips from a live stream and turn them into shorts)

* Let's speed up the audio by 1.15x
* Remember all titles / captions / overlays / motion graphics / text callouts should always live within the safe zones of a 9:16 vertical shorts or reels video so it doesn't get cropped out
* For the hook, let's not go verbatim on the question but paraphrase it in simpler words like a cliff hanger (where the title swoops in at the very start of the video) - in this case... STOP SOUNDING SCRIPTED IN PRESENTATIONS...
* Custom to this video, let's get rid of... "You can't rely on scripts." up until :17 after I say too many variables happen. Let's also get rid of the parts 1:05 - 1:10 (right before I say "What's the main takeaway"). Keep the rest of the audio
* In the hook, as I'm saying the question, I want to gradually zoom in on me as I'm saying the question from the original angle... with the title in place -- use the rising hook metallic thing up until the question is stated. Make that part of the skill
* Use captions the same way we have in the talking head editing style for outdoor videos that you did in the chat titled "Outdoor talking head edit" -- same colors, two at a time
* When I say the second line, the camera should be at a different zoom level to have contrast from the first beat to keep it engaging without being too far away or too close.
* Let's make sure that in between beats (sentences), there's no more than .1 seconds of pause in between them and no buffers at the end. It needs to feel fast-paced without cutting out words from the original audio
* When I say key words or phrases I'd rather have those as callout text where the captions normally are. Can be font in a different standout color (e.g., white) that's bigger and italicized with a red background behind it so that those words pop out. E.g., in this case when I introduce Main Point the callout words should be "What is your main point" and "What's the structure of the body"
* At the end of each beat I want a different camera zoom-level to make it feel more dynamic. E.g., when I say I call it the CTC the core the technique the close. that's a third different zoom-level in the video. They don't have to be constantly different zoom levels but they just have to differ from the previous one.
* When I say The Core The Technique and The Close I'd want to show those in a full screen overlay with my vertical talking head having a motion graphic that moves from full screen to the top left and shows C T C as a framework vertically where one letter per row, perfectly aligned on the left side. And as I say Core, Technique, Close we show those words one by one aligned to each letter of the framework. And then we change scenes away from the full screen overlay as I get into each part of the framework (return to talking head)
* When I describe "So your core message up front..." I then say "The first 12 seconds" and then I say "Main Point" and I'd like that to be callout text where it's like First 12 Seconds = Main Point or something that succinctly shows that as callout text without changing the full talking head a-roll cut.
* I want to find a good callout text, full screen overlay with talking head on left side, different zooms, caption patterns also part of the skill by the way so help me develop that
* When I say "Then, your technique is how you bring that to life." let's just leave that normal but obviously Technique should be a callout word just like Core should be previously
* I'd like you to help me identify extraneous preview fillers or insertions I say that don't honestly need to be there... a few examples I caught are... "just like we talked about with BLUF" (because that isn't important to this video in isolation -- or when I say "so it could be..." and then I say "maybe it's a concrete framework" -- the "so it could be" should be deleted since it's extraneous filler. Looking for filler like that to be removed.
* Each beat needs its own cut -- cannot have continuous footage with multiple sentences being said
* When I say "Framework" or "Impactful Interaction" or "Point of View" or "A Question" -- I want those key words as text callouts that look nice and are different from the normal captions
* And then let's use a key callout word like CLOSE
* -- But I want the callouts for CORE TECHNIQUE CLOSE to be different from any of the other text callouts because those are parts of a named framework so they should be bigger
* With each cut make sure that it's at a different zoom level from the last
* When I say "could be restated" or "broader, macro takeaway" that should also be key callout words.

Put this entirely together and let me see how the cut looks. I may give follow-on edits but the goal is we make this type of video a skill that we can run on future videos like this where we clip from a longer live stream.

You can still use prestonchinspeaks brand colors and font styles for the captions but I am looking for more standout style fonts for the callouts
If you like a motion graphic or an editing style from someone else’s video, attach a screenshot. Be as descriptive as possible when you do. Say “take the headline font and motion graphic from this video and apply the same treatment to my on-screen headline in the first 5 seconds.” Do not say “copy this look.”
Decide what goes into the skill
As you write each piece of feedback, ask one question. Is this for the skill, or only for this video?
If the note applies to more than one video, put the note in the skill. If the note only applies to this clip, keep the note on this clip.
My default is the skill. Unless a specific video calls for a particular screenshot or piece of B-roll, the instruction becomes part of the style. The goal is an editing style you plug into any raw clip.
In the brief above, the cut at 0:17 and the removed lines at 1:05 were for one video. The 1.15x speed, the cliff-hanger title with the metallic riser, the zoom change on every cut, the 0.1 second cap between sentences and the red callouts all went into the skill.
Let Fable (or Astra) cook
Once the instructions are in, let Fable or Astra work. The first build of a new style takes a while, because the model writes the skill files and builds the Resolve project at the same time.
The model comes back with a rendered MP4 on my Desktop. I watch the whole thing and give more feedback.
A detailed first brief means I rarely need more than one more round. This was the only note I gave on the second round of the livestream clip:
From the :13 mark we don’t have a distinct enough zoom-out as an alternative style. Each beat is too similar in terms of zoom-in. So I don’t want more than two consecutive beats where the zoom-in doesn’t change. Bring the focus either even closer to my face so it’s shoulders and up, or further out similar to where it was at the start of the video, and oscillate a bit more. Make it one more time.
Make sure the feedback goes into the skill too. Say in plain words: “Generalize this to the skill.” Otherwise the fix lives in one project and the next clip repeats the mistake.
Name the skill
The last step is a name you will remember when the next clip shows up. I name mine after the footage they take:
edit-outdoor-talking-head-resolvefor a single outdoor takelivestream-clip-to-shortfor a clip cut from a longer live recording
Next time, the name plus the Content ID is the whole prompt.
The third style: tutorials with screen recordings
The first two skills work on one file. A take, or a clip. The third style is the one I use for my Builds videos, where I talk through a setup on camera and the viewer has to see the screen.
This one needs the screen recordings and screenshots that show what I am describing, cut to the exact words that describe them. That part took the longest to get right, and it is the part the skill now does on its own.
Give the model your B-roll library
Give Codex or Claude Code access to your B-roll library. Every screen recording, every screenshot, every clip of you doing something. Then the skill works out of the library instead of asking you for footage on every video.
Mine is one Google Drive folder called 2025 B-Roll. Two levels only: a bucket, then the file. Screen recordings get a subfolder per tool.
2025 B-Roll/
  Videos/
    Screen recordings/
      Codex/
      ManyChat/
      DaVinci Resolve/
    Work & professional/
    Making videos/
    Lifestyle & travel/
  Images/
    Screenshots/
    Logos/
  broll-manifest.json
Each file name says what it shows and ends in _h for horizontal footage or _v for vertical. The two recordings from the video above are codex_get-codex-app-download_h.mp4 and codex_open-manychat-in-codex-browser_h.mp4.
The manifest is the part the model reads. One JSON file at the root of the library, one entry per file: the path, the tool, the length, and one sentence describing what is on screen. When the script says “first download the Codex app,” the model searches the manifest by meaning, finds the recording of me clicking download, and uses those seconds. It never browses the folder.
You do not need to organize any of this by hand. Drop all your footage into one Google Drive folder called B-Roll Library, make sure Claude Code or Codex can read it (the Google Drive desktop app mounts it as a normal folder), and paste this:
Organize the footage in my B-Roll Library folder so any human can find a clip by browsing. Two levels max: a bucket folder, then the file. Put screen recordings in a subfolder per tool. Rename every file to say what it shows, lowercase with hyphens, ending in _h for horizontal footage and _v for vertical footage. Check the orientation with ffprobe, never guess it from the file name. Then write broll-manifest.json at the root with one entry per file: path, type, tool, orientation, length, and one sentence describing what is visible on screen. Tell me what you could not place.Run the same prompt on every new batch of captures. Your editing skill reads the manifest from then on.
I record my screen recordings with Recordly, a free open-source tool. It captures my natural zoom-ins as I move around the screen, so the zoom is already in the footage. I highly recommend it.
Visualize each beat before you record
When I write a Builds script, I read it one sentence at a time and ask what the viewer should see. Three kinds of answers come up.
A logo, when I name a tool. A screenshot, when I show a prompt, a settings page or a reply. A screen recording, when something happens on screen, like typing a name into a field or clicking a button.
Then I record only the captures the library does not already have. For the video above, that was two recordings and three screenshots. Whatever sits behind the app window never makes it into the final video. The skill crops to the app.
Any beat with no capture stays on my face. I told the model this as a rule, and the rule is now in the skill: if the library has no footage that shows the thing being said, and I did not record it, leave the beat on the a-roll. Never fill a beat with a random snippet.
Download all three skills
Download the three editing skills and sound pack (ZIP). The folder holds all three skills with their reference files and scripts, plus the sound files the skills expect: the metallic riser, the transition whoosh, the mouse click for screenshot pops, the keyboard sound for typing zooms, and the background image for the framework stage.
The skills work in Claude Code or Codex. Both read the same SKILL.md format. The ZIP has an install.sh that copies the skills into whichever of the two you have installed, or add the ZIP to a chat and ask the model to install the three skills. Replace the placeholder paths and sheet ID with your own. You will need your own background music track and your own headshot for the comment card. Mine is a Pixabay track, and Pixabay does not allow sharing the file itself.
What happens after I approve the edit
When I reply with one word, “approved,” another set of skills takes over.
- One skill moves the finalized MP4 into the video’s Final folder in Melda OS and updates the card.
- Another skill writes the captions and schedules the video across 5 platforms: Instagram, Facebook, TikTok, Threads and YouTube.
- Every week I run one prompt to pull the analytics for each published video back into the same database.
One prompt starts the edit. One word finishes the job. This is the system I am building into Melda OS so you get the same loop without assembling the parts yourself.
For a custom content operating system built around your own business and footage, fill out the Work with Preston form and I will take a look.
Preston
Get more resources from me
- Work with me to build a content system around your business, footage and production workflow.
- Join the Melda OS waitlist for the content system I’m building for creators.
- How I Edit Videos From My Phone With Codex, my related walkthrough for giving edit feedback away from your desk.
Get a new build-with-AI guide every week
Weekly playbooks on prompting, agents, and content systems — free.
You're in. First email lands shortly.